Homemade Yeast Milk Bread
Hey everyone, it is Louise, welcome to our recipe site. Today, I'm gonna show you how to prepare a special dish, Homemade Yeast Milk Bread. It is one of my favorites. This time, I'm gonna make it a little bit unique. This is gonna smell and look delicious.
Homemade Yeast Milk Bread is one of the most popular of current trending meals on earth. It is easy, it's quick, it tastes delicious. It is enjoyed by millions every day. Homemade Yeast Milk Bread is something which I have loved my entire life. They are fine and they look wonderful.
Many things affect the quality of taste from Homemade Yeast Milk Bread, starting from the type of ingredients, then the selection of fresh ingredients, the ability to cut dishes to how to make and serve them. Don't worry if you want to prepare Homemade Yeast Milk Bread delicious at home, because if you already know the trick then this dish can be used as an extraordinary special treat.
As for the number of servings that can be served to make Homemade Yeast Milk Bread is 1 serving. So make sure this portion is enough to serve for yourself and your beloved family.
To get started with this particular recipe, we must prepare a few ingredients. You can cook Homemade Yeast Milk Bread using 7 ingredients and 23 steps. Here is how you can achieve that.
I'm obsessed with making bread from homemade yeast starter. I like the ratios of ingredients for the recipe for Maple Jam Bread (Recipe ID 965497) that I recently uploaded, so I just changed that a bit to make this milk bread, adapting the recipe by adding some vegetable oil and increasing the liquid ingredients to make sure the bread would still come out soft.
If you don't want the bread to get so brown, you can bake it for the last 13 minutes at 190 ℃. It seems that ovens can vary quite a bit, so adjust the times and temperatures to match your oven. Rather than strictly following the times and temperatures written in the recipe, go by the feel of the dough to judge how much you should knead the dough, how long you should let the dough rise, etc. The rising process takes time, but please just be patient. Recipe by Lesser Panda
Ingredients and spices that need to be Take to make Homemade Yeast Milk Bread:
- 250 grams ☆Bread flour
- 15 grams ☆Sugar
- 4 grams ☆Salt
- 155 grams Milk
- 100 grams Homemade yeast bread starter
- 10 grams Shortening or Unsalted butter (room temperature)
- 8 grams Vegetable oil
Instructions to make to make Homemade Yeast Milk Bread
- Put the ☆ ingredients into a bowl and mix well. Add milk and the bread starter and use your fingers or a rubber spatula to mix gently until no longer floury.

- Put the mixture from Step 1 into a bread maker or kneader. Use a rubber spatula or pastry scraper to thoroughly scrape all of the dough out of the bowl. Knead for 15 minutes (until the dough is nice and smooth).
- After 15 minutes, stop kneading, and use a pastry scraper or your hands to divide the dough into about 10 chunks. This will make the oil blend into the dough more easily. Return the dough to the bread maker or kneader.
- Add in the room-temperature shortening (or butter) and the vegetable oil, and knead for 10 more minutes. Kneading is complete when a gluten film forms and the dough is translucent enough for you to see your fingers through it when you stretch it out thinly.
- Take out the dough and form it into a smooth ball by folding it in on itself and pressing the seams of the dough ball tightly closed. Put it into a plastic bag. Hold the mouth of the bag loosely to press out the air, and then tie it shut.

- Leave the dough at room temperature overnight to let it rise to a little more than double its original volume. ※The number of hours that this step takes will depend on the temperature of the room. If the dough is rising quickly, you can slow it down by putting it in the refrigerator after awhile.
- ※ In my particular case, I let the dough rise at room temperature from about 9 PM until about 8:30 the next morning (in a chilly time of year). The amount of time that the rising takes really varies widely depending on the room temperature and so forth.
- The next day, once the dough has risen enough to fill up the bag, it's ready for the next step. Take the dough out of the bag and knead it about 3 times by turning it over, folding in the edges and pushing out any air bubbles.

- Divide the dough into two portions and form each into a round ball with a smooth, taut surface. Place plastic wrap over the balls of dough and give them about 30 minutes of "bench time" to rest at room temperature.

- Use a rolling pin to roll out each ball of dough into a 25 cm oval, pushing out any air bubbles as you go. Fold in the sides of the oval so that the right and left edges overlap a bit in the middle.

- With the rolling pin or your hands, press in the sides of the dough to fit the width of your loaf pan and then roll the dough up starting from the end closer to you. Use your fingers to pinch the end of the rolled up dough firmly closed.

- Put the rolled up dough into a greased loaf pan, and gently press down on the top of the dough with your fist to slightly flatten and even out the height of the rolls of dough.

- Cover with plastic wrap and put it into the oven on the bread-rising setting at about 30 ℃ for about 1.5 hours to let the dough rise a second time. The amount of time is approximate. Let it rise until the top of the dough is about 1.5 cm from the top of the pan.

- Pre-heat your oven to 220 ℃. The dough will continue to rise while the oven heats up, so keep it in a cool pace until the oven is ready. Just before you bake it, the dough will have risen to about 1 cm from the top of the pan.
- Bake the bread in the preheated oven at 220 ℃ for 15 minutes, and then lower the temperature to about 190~200 ℃ and bake for an additional 13 minutes. When it's done baking, drop the pan once firmly on a hard surface to loosen the bread so you can remove it from the pan.
- If the bread seems stuck to the pan, you can knock the sides of the pan against the sink or some such place, and it will come loose.

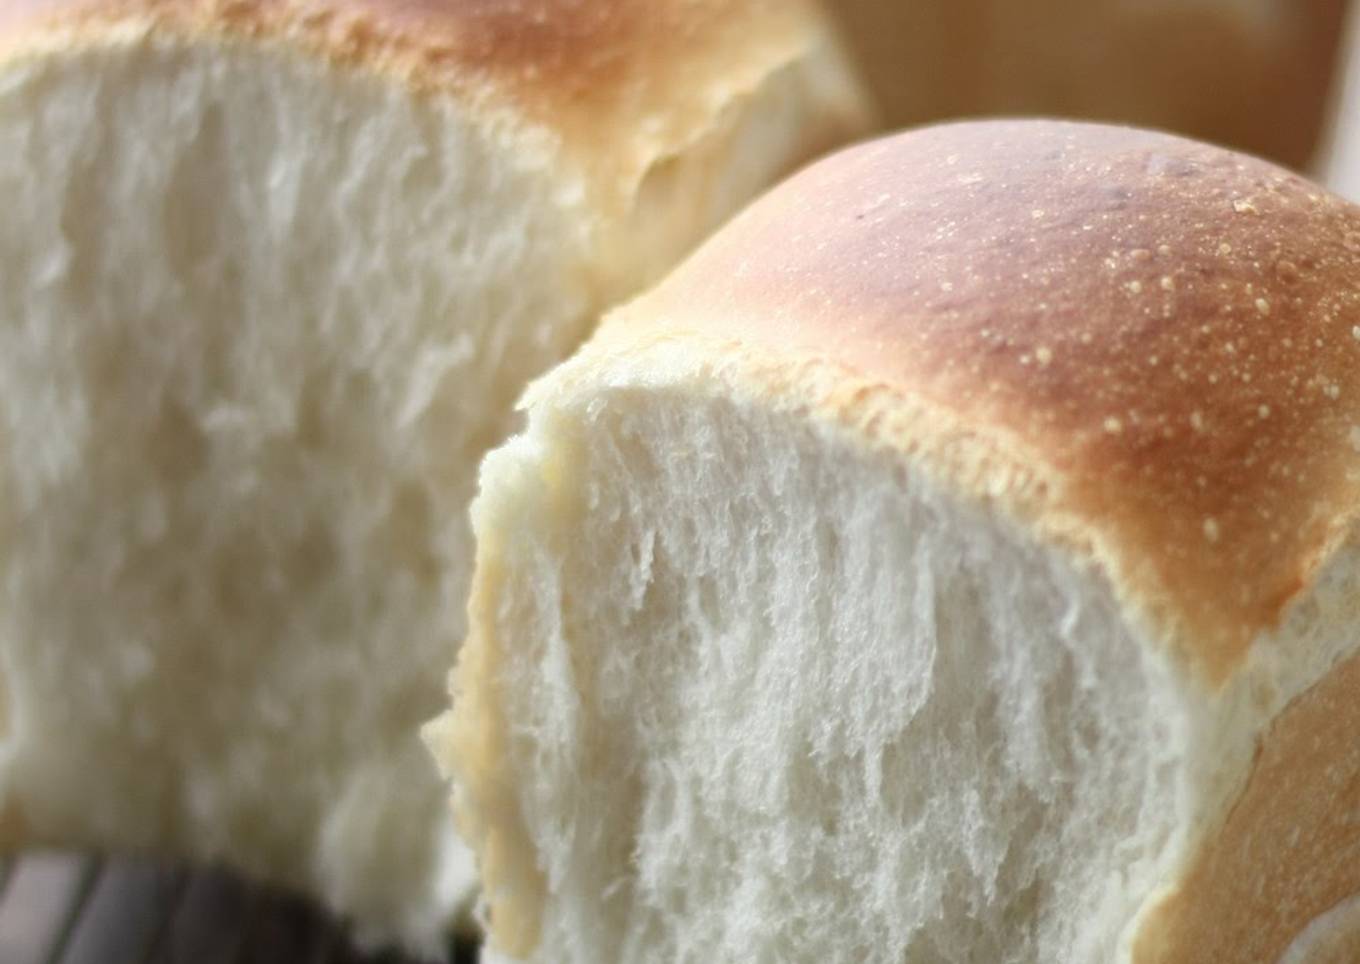
- It's so fluffy and soft!

- When I let the dough sit for the second rising until it filled up 90 percent of the pan, it spread into the corners too tightly and came out with sharp edges like this.

- The homemade yeast bread starter is made with 1 part starter liquid and one part flour mixed with a pinch of salt. It's ready to use on the 4th day. This time I used grape yeast.

- For this loaf, I used Golden Yacht brand flour and baked the bread with rounded tops. To get this rounded top, on the second rising, let the dough rise all the way to the top of the loaf pan and then bake for 25~30 minutes at 190 ℃.

- These photos are from a time when I let the dough rise overnight for about 8 hours at a room temperature of about 20 ℃ and then, because of my schedule, put the dough in the refrigerator for about 2 hours for the second rising.

- Here are some freshly made white bread rolls. I made these by dividing the dough into portions of about 50 g and baking for 10 minutes at 170 ℃ and then an additional 5 minutes at 160 ℃. They came out so light and soft.

- These are round-topped loaves made with Haruyo Koi Blend flour.

As your experience and self-confidence grows, you will find that you have more natural control over your diet as well as adjust your diet regimen to your individual tastes gradually. Whether you wish to offer a recipe that utilizes fewer or more ingredients or is a bit essentially hot, you can make straightforward adjustments to accomplish this objective. Simply put, begin making your recipes on schedule. As for fundamental cooking abilities for novices you do not need to discover them however only if you grasp some basic food preparation methods.
This isn't a total overview to fast as well as very easy lunch dishes but its good something to chew on. With any luck this will get your imaginative juices moving so you can prepare tasty meals for your household without doing a lot of square meals on your journey.
So that's going to wrap this up with this special food Step-by-Step Guide to Prepare Ultimate Homemade Yeast Milk Bread. Thank you very much for reading. I am confident that you will make this at home. There's gonna be interesting food at home recipes coming up. Remember to save this page in your browser, and share it to your loved ones, friends and colleague. Thanks again for reading. Go on get cooking!


Comments
Post a Comment